Showing posts with label Tutorials. Show all posts

5/29/2012

Make it Monday: DIY Jewelry Display

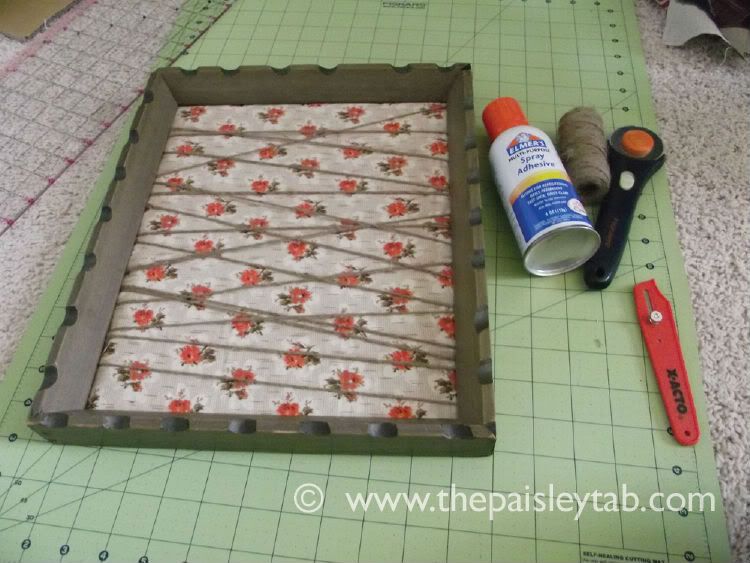
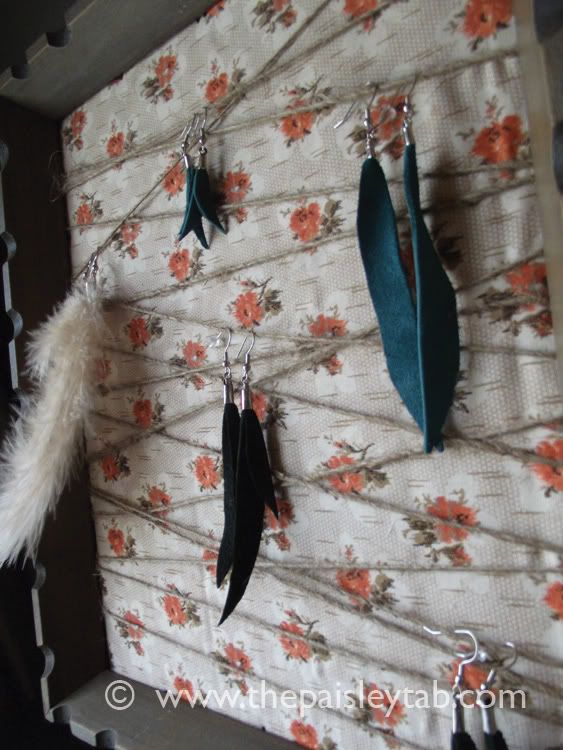
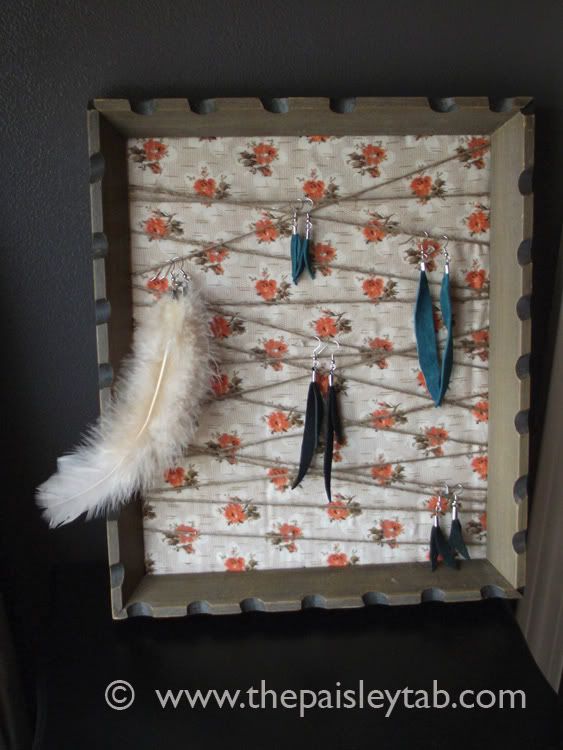
I'm preparing for a craft show in a couple weeks, so I needed to create a way to display some of the jewelry I've been making.  This Jewelry frame would be perfect for either a craft show, or just a great way to display your jewelry at home - in an organized manner so you can see what you have & you'll know where your jewelry is when you want to wear it! 

WHAT YOU NEED:
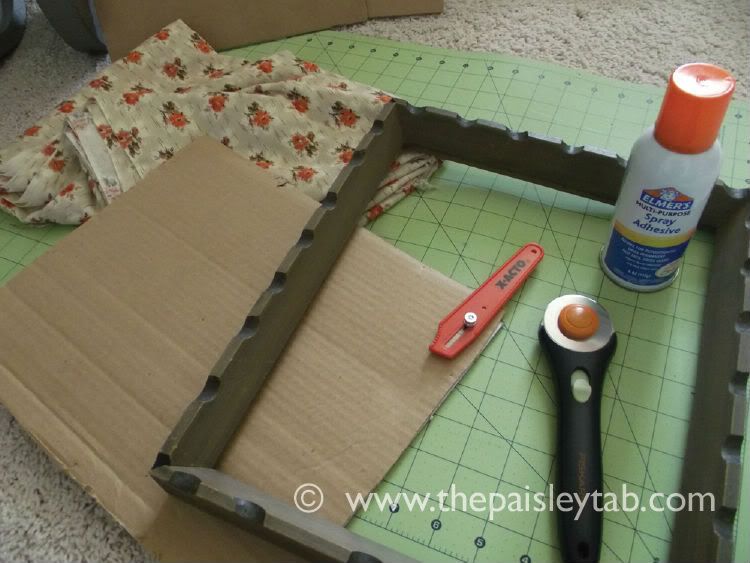
Frame (I picked mine up at Goodwill.)
Spray Adhesive
Cardboard or Foam Core
Fabric (I went with some vintage fabric I found at an Antique shop.)
Jute string
Tools to cut fabric and cardboard

STEPS:
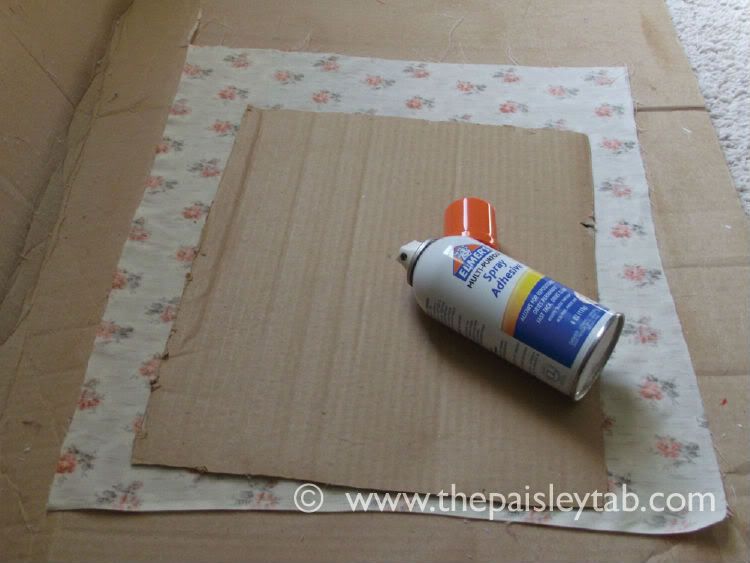
1. Trim fabric to be slightly larger then your cardboard.
2. Spray Adhesive to cardboard. 
3. Place stickyside down on backside of fabric.
4.Wrap edges around cardboard.
5. Wrap Jute string tightly around fabric board.
6. Place fabric board inside frame.

Voila!


8/31/2011

Get Ready For Fall!

Photobucket

Looking for some new Fall crafts to make?  
Well, it just so happens that EverythingEtsy was so kind and gathered together 101 fabulous Fall tutorials!

I am especially fond of these tutorials:
the upcycled scarflette at:
I am Momma Hear me Roar! 

the pine cone garland at:
Twig & Thistle
 

.....but that's just a taste of the fun...
there are 97 more tutorials!

You don't need to surf around cyberspace, 
if you don't see it on this list, then I don't think it exists!
Today is the last day of August.  
Where did the time go?
  
Fall is just around the corner!  
This is such a fun/cozy time of year.  
Click over to EverythingEtsy and get your Craft on!

-XOXOXO,
Tiffany

Photobucket

PhotobucketPhotobucketPhotobucketPhotobucket

8/13/2011

How to make Limoncello - Video 3

Here it is, the third and final video tutorial on making Limoncello....Finally!  This was taped early this spring, but I have been so busy and couldn't find time to edit it.  Forgive me, it's a little "raw".  ...Better late then never!
Thanks for your patience! I hope you try it and love it as much as my husband and I do. It's a great little reminder of our fabulous travels in Italy! If you missed the other videos, you can watch them here: video one and video two.

6/13/2011

Make it Monday: DIY Candle

The other day I was cleaning the house and I came across a box of crayons. I don't have kids and I don't color, so I was about to toss them in a stash of stuff to donate to Goodwill, but then I thought...hmm...I think I'm going to try to make a candle with some of these crayons - and that is just what I did. See below for the instructions so you can make your own candle. It's so easy! Click the image to enlarge.

Click above to enlarge.

6/10/2011

DIY Leather Eyeglass Case

Until now, I have only sewn projects with cloth, but back in December a friend of mine told me about this segment that she saw on Good Morning America.  On the show, Project Runway finalist, Laura Bennett demonstrated how to make a DIY leather eyeglass case.  I bought all the materials -  leather, hardware, needles, etc....etc...awhile ago, but I finally just got around to making it.  I actually made two cases.  On the program, Laura talked about gluing the leather together.  That sounded strange to me, so I decided to sew mine.  ...And holy cow, that was a challenge!  It was a big enough struggle that I decided to try my hand at gluing the second one, since that  was how Laura did it and it turned out fine.  I was a little skeptical at how well it would hold, but I think it's pretty sturdy.  Sewing with leather was tricky, so I think I'll dig around for some tips before I give it another whirl but I  am so not giving up!  If you are interested in making one of these snazzy cases, click HERE for the step by step tutorial, or scroll down for the video.  

Happy Friday my loves! 
Have a GORGEOUS weekend!


The Paisley Tab
is HOT!  Please Fan Us


5/07/2011

How to make Limoncello - Video 2

Forgive me for the delay.  I have been busy juggling my graphic design projects, visual merchandising job, and sewing for The Paisley TabBut here it is...(at last) - step 2/video 2 on making Limoncello.  After this step we just need to strain, bottle and chill.  That will be the third and final step - and I can hardly wait!  
Enjoy!

3/08/2011

How to make Limoncello - Video 1

Italy is such an amazing place. If you have never been - start planning a trip now - it is a place you MUST visit at some point in your life! The country has so much to offer in history, art, cuisine, shopping, etc. One discovery we made while we were there was Limoncello. It is some amazing stuff.  I made some last fall and I'm almost out, so I decided it was time to make some more.  Here is my step by step tutorial to show you how to make it!  Cheers!
On a side note,...another discovery we made while in Italy, was that a traffic ticket is issued every 40 seconds in the city of Florence.  Consider this your warning in case you decide to visit.  Sadly, the city is loaded with cameras - ready to catch your violation and the traffic is insane there so it's hard to avoid a mishap.  It got us and it might get you too!  Fortunately the city had so much charm that we couldn't hold a grudge for too long.

2/27/2011

It's Sew Saturday...

...and what makes today different than all the other Sew Saturdays? Well, today I'm not sewing on fabric. ...I'm making a little switch-a-roo to paper.   "PAPER"? - You say? Yes, paper.  Why?  Because ordinary is boring, so I decided to whip up - or rather stitch up some invitation sleeves for our neighborhood party. ...And I thought I'd share the easy four-step instructions for this very inexpensive project.  Let's get started!
Supplies needed: You will need thread, scissors, textured scissors (optional), paper bag, and a lighter.

Step 1: Cut out a piece of paper double the length of your invitation allow a little extra space on the sides to allow room for invitation and for seam allowance.

Step 2: Stitch the sides closed.  I did a standard straight stitch, but you can do any stitch.  Don't be shy - get as crazy as your creative little heart desires!

Step 3: Cut off the top.  I started off using these textured scissors to give it a rough-torn look, however in the next step you will find that it's really not necessary.  I decided to keep this step in the mix in case you don't feel comfortable doing #4.

Step 4: Warning this is a stinky step! Grab your lighter and singe the top-opening section of the invitation sleeve.  Blow out the flame quickly, it only needs a second to singe down.   Be-careful.  If you don't feel 100% safe doing this, grab a spray bottle - for the unlikely event that you need to spray out the fire.  If you don't use texturing scissors, the flame will have the same effect on the paper.

Here is a close up of what step 4's effect does to your paper.
The finished product.
The aftermath - paper shavings and ashes.
Click on above images to enlarge.

1/22/2011

DIY Manicure at home


Pop sugar posted this wonderful tutorial for a professional manicure. Follow these easy steps and you can get a gorgeous, Salon quality manicure without ever leaving the house. Now, pocket that money, because you'll need it for a coffee later.

1/21/2011

Afro-tastic!


I found this video today... on lovemaegan.com and I'm dieing to try it.  I've always wanted to try an afro for a day...and this tutorial gives me all the instructions to do it.  I have naturally curly hair that I straighten everyday.  The problem is that my natural curls are lumpy and unattractive.  ... But if I could get the tight curl and overall poof without the chemicals of a perm...then bring it on!
Related Posts Plugin for WordPress, Blogger...